A bad idea—even well-executed—is still a bad idea. And, ultimately a waste of time and energy.
With so much at stake, learning how to identify and avoid these looming catastrophes is absolutely essential. At Simplease, we’ve developed a 7-step process using UXPin and Userbrain that identifies and kills bad design ideas before they have a chance to wreak havoc on our projects.
At its core, our process involves testing ideas as early as possible, rapid prototyping, and usability testing. We’ve shaped this approach to fit how we work and to make it as useful and accessible as possible.
These seven steps are easy to fit into your own projects, so I’m going to explain each one by walking you through one of our recent projects.
Step 1. Identify the problem
If people tell you what they want, it’s NOT your job to give it to them. Your objective is to understand WHY they want it—to learn more about the problem they hope to solve.
We do so by asking questions and listening closely to how our client and other stakeholders respond to a series of questions we pose. If you’re familiar with the TV series Columbo, you already know how this works. Let me explain.
Each Columbo episode is structured exactly the same way. In the beginning, you always see how someone is murdered. Though the viewer already knows the murderer, Inspector Columbo has no idea. For the rest of the episode, you watch him figuring out who committed the crime. (Needless to say, he catches the murderer every time.)

By NBC Television (eBay item photo) [Public domain], via Wikimedia Commons
Why am I telling you this? Because interpreting evidence and clues is very much like identifying a design problem. It requires reverse engineering.
When we started working with MegaCorp (not the client’s real name), we were overwhelmed by the sheer number of stakeholders and their differing perceptions of current problems and challenges. It was anything but obvious which problem we should aim to solve, and just like Inspector Columbo, we had to invest a lot of time conducting interviews and asking questions:
- When was the last time you had this problem?
- Can you please describe what exactly happened?
- That’s interesting! Can you please explain this in more detail?
- Did you use any tools, or maybe something else you can show us?
One thing you should notice when looking at these questions is that they are all asking for past behavior. Why? Because we’re interested in facts, not opinions or ideas.
In our interviews with MegaCorp employees, we discovered they were suffering from internal communication problems (which company isn’t?) and they used a wide range of tools to tackle this problem. One of these tools was an Excel file developed to help team leaders to plan, organize, and host weekly (or biweekly) meetings with their project teams.
The biggest problem with this Excel file was that most people at MegaCorp didn’t even know it existed. And those who knew about it didn’t like to use it because of its terrible usability. In contrast, those who used it considered it an invaluable tool. That’s why we scheduled interviews; we asked employees to show us how they used the Excel file, and then explain what they were using it for.
But unlike Inspector Columbo, we’re not done once we’ve identified a problem. That’s the point where we’re really getting started …
2. Sketch out ideas to solve the problem
If you’re thinking of a specific solution, you’ve already gone too far. Why? Because you can’t be sure that this one is actually the right solution for the problem.
Before we even started doing anything else, we got ourselves some sheets of paper and began drawing quick sketches to simply get ideas out of our heads. The reason for this is that your first ideas usually aren’t very good—because you don’t understand the problem well enough at this point.
Pushing out a multitude of potential solutions accelerates ideation in the same way a pressure cooker accelerates cooking. Once you get into a groove, it’s safe to tone it down and let the ideas percolate.
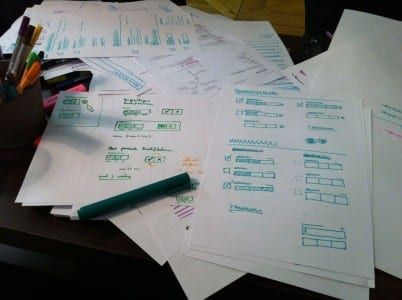
Sketching is the fastest way to get ideas out of your head and decide if they could actually work
Sketching is more about finding the right design, as opposed to getting your design right. That’s why we start the process by focusing on quantity—generating as many different designs as possible instead of latching onto our first solution and running with it. Sure, it’s a solution, but it might be the wrong solution. We have to find this out first, because if it is, there’s no point in perfecting it.
Ignore the details early on. You will have plenty of time to work on them once you’ve discovered a good idea for your design.
In the case of MegaCorp, my mind was set on the Excel file they had been using. I thought that if we could just make this Excel file better and turn it into a user-friendly web application, we would eventually solve their problem. Although this seems like the logical solution, it turned out to be fundamentally flawed, as you’ll see later.
But first, it’s time to show your sketches to colleagues for some quick feedback before you begin building a prototype.
3. Share your sketches with your team
At this stage, you’re looking for what doesn’t work. Find out which ideas to kill before you dive deeper. Typically, feedback from colleagues is a perfect way to filter before showing anything to one of your users.
The easiest way to share your sketches is to approach a colleague and ask for a few minutes of his or her time.
If this person is already familiar with the project, you can start asking for feedback right away. If he or she doesn’t know about the project, just explain the problem you’re trying to solve. (This also helps you better understand the problem because you have to explain it to someone else.)
Once your colleague understands the situation, begin to show your sketches—but DON’T explain any of them.
I usually only clarify the problem. My solution should be obvious, after that. If you keep asking for feedback without explaining or defending your solutions, you’re increasing your chances of achieving a design that really works.
How to ask for feedback: Ask people if they have a minute or so to help you with something. Most people like to help and will do so if they have the time. Also, tell them you’re interested in their thoughts and opinions; I have yet to meet someone who doesn’t like to know their opinion is valued.
That said, giving feedback is harder than asking for it.
How to give feedback: Before stating your (subjective) opinion, ask the designer to explain his or her thinking on the ideas you don’t think are good enough, yet. Ask why they made it the way it is. Asking why allows you to question the weak points without killing the morale of your colleagues by saying it’s bad, and it’s actually one of the best ways to understand a problem.
How to take feedback: With a grain of salt. Soak up everything, but don’t necessarily act on any of the reactions you receive. If the feedback was subjective, try to uncover the reason behind this thinking, or better yet, just ask for it. It’s hard for people to show their thought process instead of just revealing their opinions.
We’re so accustomed to talking about the tip of the iceberg that we forgot how to go deep, all the way down to the root of the issue. Your colleagues’ opinions are only supposed to provide you with input that will make it easier to pursue future design decisions—not to dictate them.
Grab design ebooks created by best designers
All for free
Do you want to know more about UI Design?
Download 'Interaction Design Best Practices' FOR FREE!
Download e-book for free4. Revise your sketches and prototype your epicenter
Once you found an idea that might work, build a quick prototype. Because it’s only meant to bring you one step closer to the right design, you could even think of it as a disposable prototype.
I tried many different approaches over the years, but the one that works best for me is to start designing the most complex state (or screen) first and then backwards-engineer to gradually design a complete task flow.
“If it’s your job to eat a frog, eat it first thing in the morning. If it’s your job to eat two frogs, eat the bigger one first.”
— Mark Twain
While this may sound counter-intuitive to some of you, it’s actually the same approach productivity experts propose when they speak about “eating the big frog first”.
The first thing I do is to start with the core and build outwards—something the guys at Basecamp call epicenter design.
The epicenter is whatever the page absolutely can’t live without.
In our case, it was the list of information points, to-dos, etc. being discussed during meetings and written down by the person conducting the meeting.
After some exploration to determine how the epicenter could be laid out, I divided the screen in sections to accommodate other parts, like info panes, menus, and action bars.
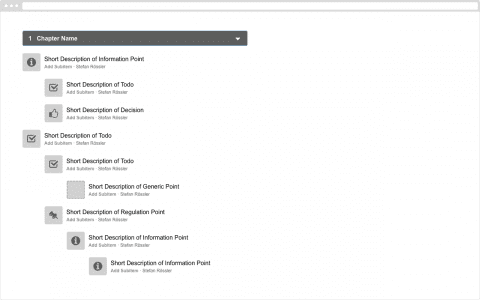
The goal of our first finished screen created in UXPin is to show as much complexity as possible. This is the only way to ensure your concept doesn’t break before you begin making all the various screens needed to build a prototype for testing.
Once you’re satisfied with how your complex screen works, it’s an easy and straightforward task to backwards-engineer. You’ll then show the complete user flow through the application. In this case, how to add chapters and create your first entry.
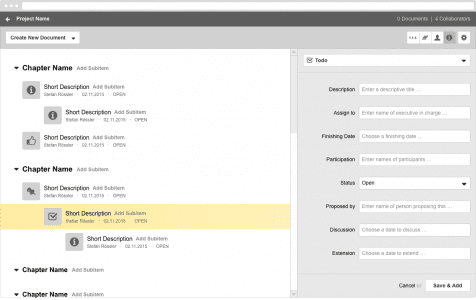
Our rapid prototype created in UXPin
5. Test your prototype with potential users
You’re not testing your prototype to make sure it works. You’re testing to find out what doesn’t work. Do everything you can to make things break, then discard whatever doesn’t work.
As strange as it sounds, the most important part of testing prototypes is to make appointments.
Appointments help you focus on getting things done. I don’t know about you, but I find prototyping to be such a challenging and fun activity that it’s usually hard for me to stop it. But if I have an appointment in about 30 minutes, I just have to stop.
And guess what, you can stop prototyping anytime you want or need to. Why? Because you can test anything—even if it’s only scribbles on a napkin.
The more advanced your prototype, the more you can test, and the more insights you will gain. Even a prototype with 2 or 3 screens is more than enough for an hour of usability testing, especially if you’re testing with potential users (which is extremely important in the beginning).
Here’s a short article about do-it-yourself testing for creators and one about why designers should do their own usability testing in case you’re not yet familiar with how to do the actual testing.
6. Interpret your test results
Early usability tests help you determine the effectiveness of your design ideas.
If you have the opportunity to test with potential users, the first thing you’ll discover is whether or not your prototype is addressing the right problem (or at least a real problem).
That said, testing with potential users is crucial in the early stages of your design process to make sure you’re not investing time and energy going in the wrong direction, a.k.a. solving a problem that doesn’t really exist. And that’s exactly what happened in this project.
Since I was testing with potential users, I took a chance and turned the sessions into actual user interviews (described in step 1). The only difference was that instead of letting them explain a problem or show me current solutions for this problem, I was showing them our solution (our prototype) and asked if it could potentially solve their problem.
- If you think about the last time you did something like this, did you need this kind of feature?
- Can you please describe to me what exactly you needed when you did this for the last time?
- Is there a critical feature missing that you would absolutely need in order to solve the problem?
- Let’s not talk about the feature; instead, tell me more about the issue and why it’s important to solve it.
Testing with potential users made it obvious that we were solving the wrong problem. That’s why our entire 7-step process is focused on quantity rather than quality. And that’s why it wasn’t a step back returning to the drawing board and starting a new prototype.
Before building a new prototype, finish your testing sessions and gather as many insights as possible while you can. You’re really only testing your prototypes to make them break (and learn something new), not to pass some kind of quality assurance.
If our prototype solves the problem, it’s effective. If users aren’t able to solve their problem with our prototype, it’s ineffective. It’s as simple as that.
It’s important to underline that effectiveness beats efficiency and satisfaction—especially in these early stages. Why? Because it lets you know whether you already have a real solution (effective) or if you’re still in the phase of killing bad ideas (ineffective).
As soon as your prototype solves the correct problem, it’s time to focus on how well your prototype really solves it.
The process I’m describing is intended to discover an effective solution—not to measure its usability.
7. Build a new prototype and keep testing
The more prototypes you’re building (and testing), the better your solution will eventually be. The most effective way is by building quick & dirty prototypes, then watch them break during usability tests to reveal bad ideas. Keep this up until you arrive at an idea that’s really good.
But what do you do after you’ve found an idea that works? Now you start improving the details of your solution based on user feedback.
Since you’ve already found the right design by testing with the right users early on, you can really focus on perfecting this design by improving the usability of your solution.
The truly amazing thing is that in most cases you don’t even need representative users for testing prototypes that can go live.
Why?
Because if you include potential users in the earlier stages, you will already know you have the right design at this point. And so, to improve the usability of this “right” design, the only thing you need is to test it with anyone who understands the problem you are solving.
Another important point: while you’re moderating your early usability tests, the solution will eventually be used by people on their own, without you sitting next to them. That’s why it’s beneficial to switch to unmoderated testing (we used Userbrain) as soon as you stumble across the right design.
Switching to unmoderated testing bridges the gap between finding the design and getting the design right. It helps you fix the glaring holes in your prototypes and forces you to build something that’s self explanatory.
Just make sure you kill your bad ideas with rapid prototyping before you spend your time and energy on perfecting a solution that might just be irrelevant.
If you found this post useful, check out the free 100+ page e-book UX Design Process Best Practices.

Feature photo credit: Think With Google